Parametric equalizer (PEq)
Precise control of selected frequencies: where to change the sound, by how much and over how wide a range.
How to open and enable it
Settings → Build your SHIKARDOS → Parametric equalizer → Done. Then open EQ → PEq and tap “Apply equalizer”,if the button is shown.
Play a familiar song at a comfortable volume. If the EQ letters at the top are dim, check whether unprocessed comparison is enabled.
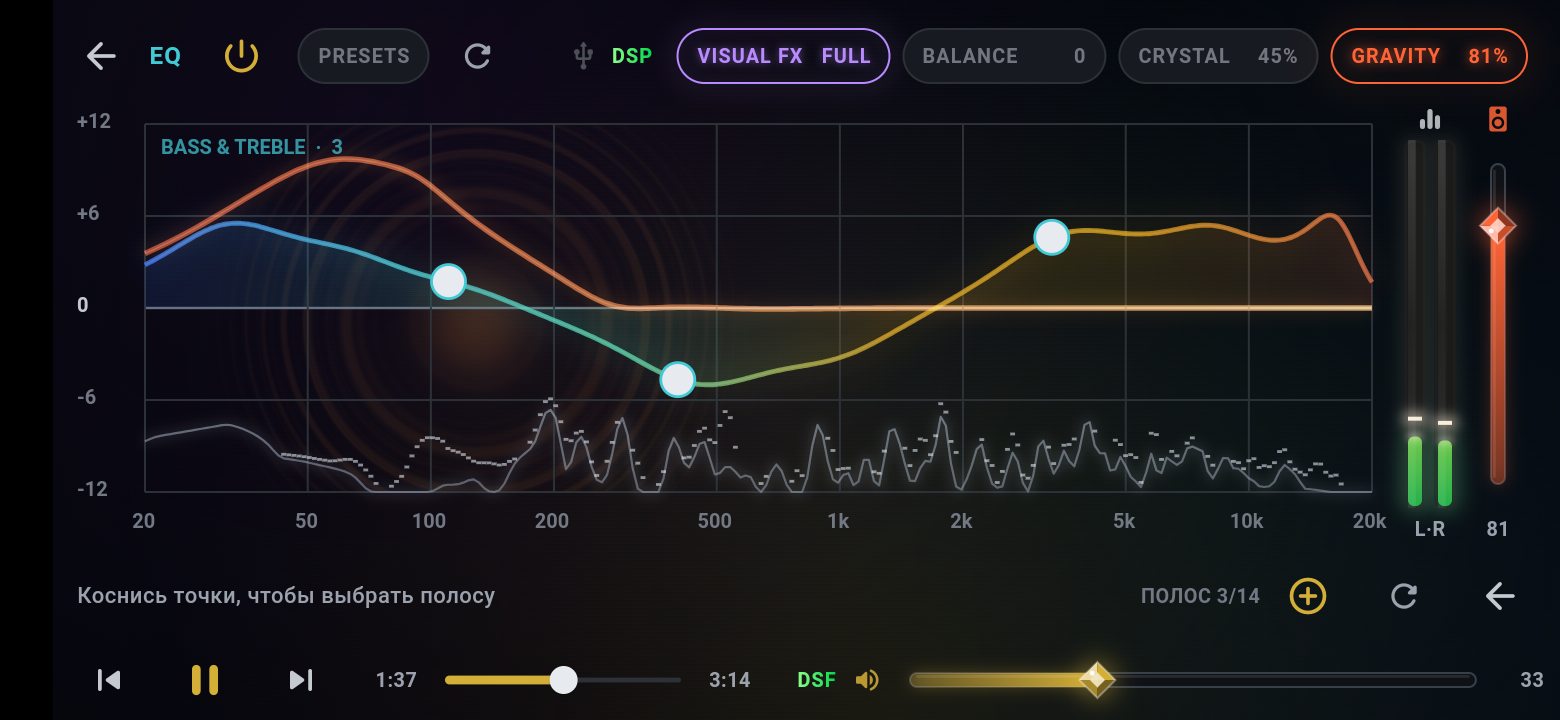
The parametric equalizer screen
Control diagram. Horizontal position is frequency; vertical position is gain. Each point belongs to its own band.
All band settings: frequency, gain, Q and shape →
- Open PEq and apply it to hear your settings.
- Add a band with the “+” button.
- Move the point horizontally to select frequency, and vertically to boost or cut.
- Set the affected width in the band settings. Start with a small change.
- To compare one band, use “Bypass band”; use “Restore band” to bring it back. “Delete band” removes it from the settings.
You change a selected part of the spectrum by controlling frequency, gain and width.
PEq: frequency — where to change the sound
Frequency selects the region of sound that the band will change.
EQ → PEq → select a point or add a band with “+”.
Hz / kHz. Horizontally: lower frequencies to the left, higher to the right.
How to use it
- Select a band. Move it horizontally or enter the frequency in its settings.
- Start with a small boost or cut: this makes the desired region easier to find.
- Compare the enabled band with “Bypass band”. Restore it afterwards if needed.
What you will hear
The correction moves to a different region, for example from boomy bass to the midrange.
PEq: band gain — how much to add
Gain boosts or cuts the selected region.
EQ → PEq → point and settings for the selected band.
dB: positive boosts, negative cuts, 0 leaves this band unchanged.
How to use it
- Raise the point to boost or lower it to cut.
- If a region sounds too loud, try a small cut first.
- Watch for overload when making several boosts. PRE provides headroom before processing.
What you will hear
The selected region becomes more prominent or more subdued.
PEq: Q — bell width
Q determines how narrow a region a bell-shaped band affects.
EQ → PEq → PEAK / bell band → Q.
Higher Q — narrower; lower Q — wider.
How to use it
- Select the bell shape and frequency.
- Increase Q for a narrow local correction; decrease it for a smooth change across a broad region.
- Compare before and after on several passages. A narrow adjustment for one sound may not suit the entire recording.
What you will hear
At the same frequency and gain, the range of neighboring frequencies affected changes.
PEq: bell, shelves and slope S
The shape determines which frequencies change around the selected point.
EQ → PEq → band settings → filter type.
PEAK — around the selected frequency; LOW SHELF — the low end; HIGH SHELF — the high end.
How to use it
- Use a bell for a particular region of the spectrum.
- Choose a low shelf to change the entire low end relative to the transition frequency. Use a high shelf for the upper spectrum.
- A shelf has an S slope setting, which changes the transition into the boosted or cut region. Bell width is set by Q.
What you will hear
A shelf changes one whole side of the spectrum; a bell changes the region around its frequency.
Example: reduce harshness in particular sounds
- Add one band with “+” and select a bell.
- Set a small cut. Move the frequency through the region where you hear harshness. This is often the midrange or treble, but the exact location depends on the recording.
- Start with a broad, gentle correction; raise Q only if you need to affect a narrower region.
- Tap “Bypass band” and compare. “Restore band” enables it again; “Delete band” removes it from the settings.
On-screen buttons: what they do
Additional controls
Select the control name you need. Its explanation opens immediately.
Comparison and reset
Tap the large EQ letters at the top of the equalizer screen EQto temporarily bypass processing. Tap again to restore it. This is a processed/unprocessed comparison, called “CLEAN” in other views.
The control positions are preserved. Listen to the same passage at the same volume. Do not use reset if you only want to compare the sound.
The circular-arrow button resets sound settings. Read the confirmation and proceed only if you want to start again. Save complex settings beforehand.
GEq also has a separate “RESET” above its bands. Resetting bands and resetting the entire active sound section are different actions.
Explore the principle in an interactive diagram
The website diagram helps explain the principle. It does not change your app's settings or process music.
Open the PEq diagram →